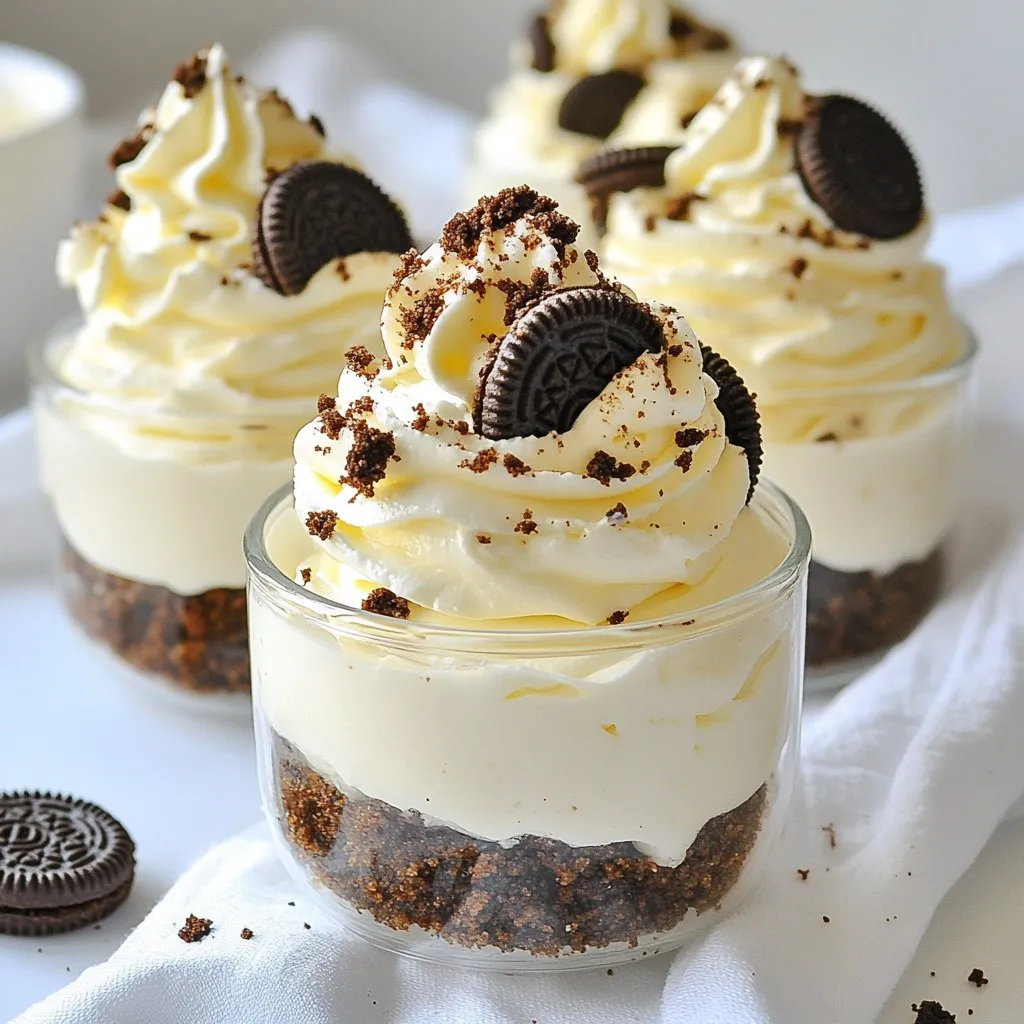
Looking for a fun and easy dessert? These No-Bake Oreo Cheesecake Cups are perfect! You’ll love how simple they are to make. With just a few ingredients, you can whip up a delightful treat that everyone will enjoy. Don’t let baking intimidate you—these cups are no-fuss and full of flavor. Let’s dive into the recipe and create a sweet delight that will impress your friends and family!
Why I Love This Recipe
- Easy to Make: This no-bake recipe comes together in just 20 minutes, making it perfect for last-minute gatherings or dessert cravings.
- Deliciously Decadent: The combination of creamy cheesecake and crunchy Oreos creates a delightful texture and flavor that everyone loves.
- Perfect for Any Occasion: These cheesecake cups are versatile enough for parties, holidays, or simply enjoying a treat at home.
- Customizable: You can easily adjust the toppings or add different flavors to the cheesecake filling for a unique twist each time.
Ingredients
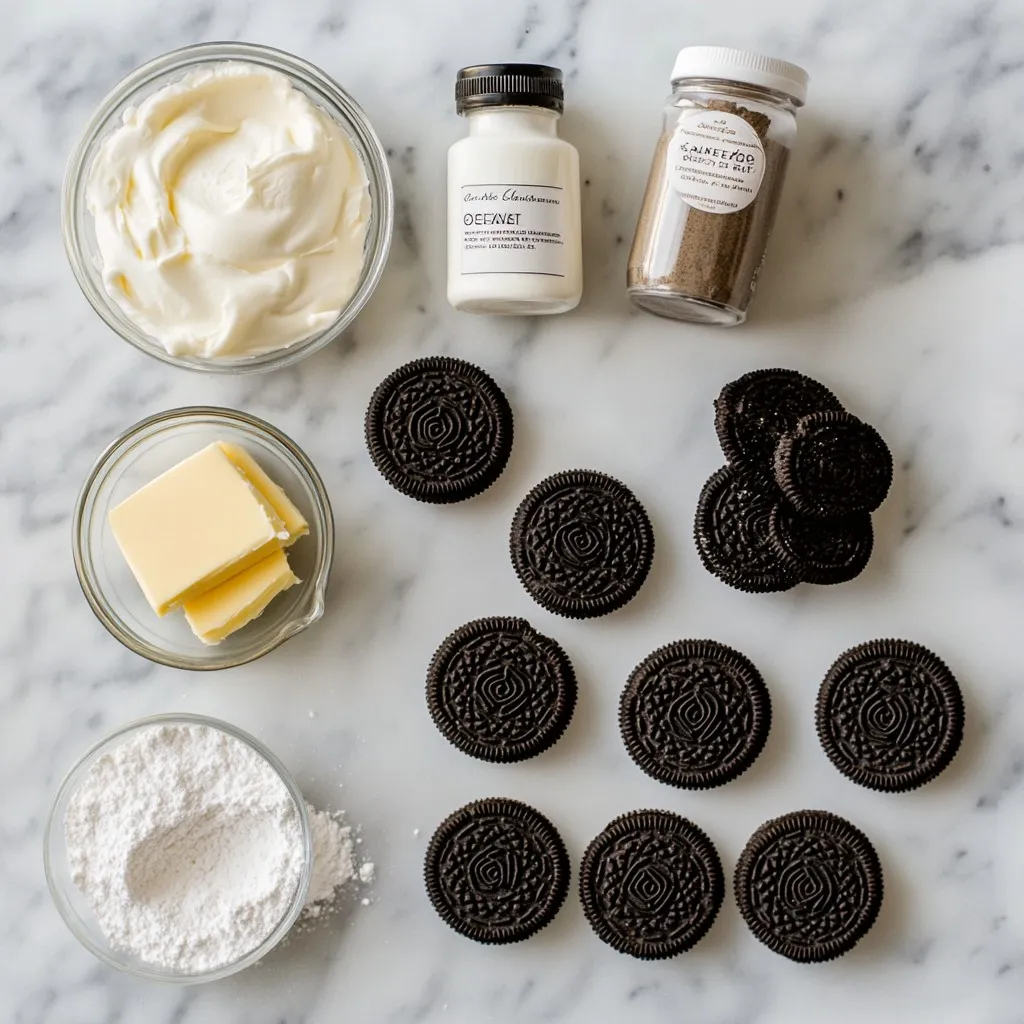
List of Ingredients Required
– 18 Oreo cookies, crushed
– 4 tablespoons unsalted butter, melted
– 1 (8 oz) package cream cheese, softened
– 1/2 cup powdered sugar
– 1 teaspoon vanilla extract
– 1 cup heavy whipping cream
– 8 Oreo cookies, chopped (for filling and topping)
Explanation of Ingredient Choices
I choose Oreo cookies for their rich chocolate flavor. Their cream center adds sweetness. Unsalted butter binds the crust and gives it a smooth texture. Cream cheese creates a rich, creamy filling. Powdered sugar sweetens the mixture without grittiness. Vanilla adds warmth and depth. Heavy whipping cream brings air, making the cheesecake light. Chopped Oreos in the filling give added crunch and flavor.
Possible Ingredient Substitutions
If you don’t have Oreos, use any chocolate cookies. You can swap cream cheese for mascarpone for a different taste. If you prefer a healthier option, Greek yogurt can replace cream cheese. For a dairy-free version, use vegan cream cheese and coconut cream. If you lack powdered sugar, granulated sugar works in a pinch; just blend it finely first.
Step-by-Step Instructions
Creating the Crust
To start, grab a medium bowl. Add 18 crushed Oreo cookies and 4 tablespoons of melted butter. Mix them well until the crumbs are fully coated. This mixture will be the base of your dessert. It adds a tasty crunch and rich flavor.
Preparing the Cheesecake Filling
Next, take a large mixing bowl. Beat 1 package of softened cream cheese until it becomes smooth. Slowly add 1/2 cup of powdered sugar and 1 teaspoon of vanilla extract. Mix until everything is nicely combined. This filling will give your cheesecake a creamy texture and sweet taste.
Whipping the Cream and Combining Mixtures
In another bowl, pour 1 cup of heavy whipping cream. Whip it until stiff peaks form. This step is key for a light and airy fill. Gently fold your whipped cream into the cream cheese mixture. Make sure to mix carefully so you keep that fluffy texture intact.
Assembling the Cups
Now, it’s time to layer your cups. Start with 2 tablespoons of the Oreo crust at the bottom of each cup. Then, add a generous layer of the cheesecake filling. Repeat these layers until you fill the cups. Finish with a layer of the cheesecake on top. This will look stunning and taste amazing!
Chilling Instructions
Finally, cover your cups and refrigerate them for at least 4 hours. This chilling time helps set the cheesecake. Once set, your delicious No-Bake Oreo Cheesecake Cups are ready to enjoy. You can add extra chopped Oreos on top for decoration before serving.
Tips & Tricks
How to Achieve the Perfect Whipped Cream
To make the best whipped cream, start with cold heavy cream. Make sure your mixing bowl is also cold. This helps the cream whip better. Use an electric mixer on medium speed. Whip until stiff peaks form. Don’t over-whip, or it can become grainy. A perfect whipped cream will be light and fluffy. You can add a bit of powdered sugar to sweeten it. This will help it hold its shape too.
Common Mistakes to Avoid
One big mistake is not letting the cream cheese sit out. Make sure it softens at room temperature. This makes it easier to mix. Also, don’t rush the folding process. Gently fold the whipped cream into the cheesecake mix. If you mix too hard, you lose the air. Lastly, be patient with chilling. If you don’t chill long enough, the cups won’t set well.
Enhancing Flavor with Additional Ingredients
You can jazz up your cheesecake cups easily. Try adding some lemon zest for a fresh twist. You could also mix in a bit of peanut butter for richness. If you like mint, use mint Oreo cookies instead. For a chocolate kick, add cocoa powder to the cream cheese mix. Always taste your mixture as you go. This ensures you get just the flavor you want. Mix and match until you find your favorite!
Pro Tips
- Use Cold Ingredients: Ensure your cream cheese and heavy cream are well-chilled for easier mixing and a smoother texture.
- Layering Technique: For a visually appealing dessert, use a piping bag to layer the cheesecake filling for a clean, neat finish.
- Garnish Creatively: Experiment with toppings like chocolate shavings or whipped cream to enhance flavor and presentation.
- Chill Longer: If time allows, chill the cheesecake cups overnight for a firmer set and better flavor melding.
Variations
Different Flavor Combinations (e.g., Mint Oreo, Peanut Butter)
You can change the flavor of your cheesecake cups using different Oreos. For a minty treat, use Mint Oreo cookies in the crust and filling. The fresh taste pairs well with the creamy cheesecake. Another great option is to use Peanut Butter Oreos. They add a rich flavor that makes each bite special. You can even add a spoonful of peanut butter to the cheesecake filling for an extra peanuty kick. Try different flavors to find your favorite!
Serving Suggestions for Special Occasions
These no-bake cheesecake cups shine at parties and gatherings. For birthdays, add colorful sprinkles or candles on top. At holidays, use themed toppings like crushed peppermint or pumpkin spice. If you have a picnic, serve them in mason jars for fun. You can also prepare mini cups for a wedding or shower. Guests will love having their own tasty treat. Just make sure to have cute spoons ready for easy eating!
Alternative Serving Containers
While individual cups are great, you can get creative with containers. Use glass jars for a rustic look. Small bowls can work well too. For a fun twist, try serving in cupcake liners placed in a muffin tin. This makes for easy transport and serving. You can also use shot glasses for a fun, bite-sized dessert. Whatever you choose, the key is to have fun with the presentation!
Storage Information
Best Practices for Storing Leftovers
To keep your No-Bake Oreo Cheesecake Cups fresh, store them in the fridge. Use airtight containers or cover each cup with plastic wrap. This keeps moisture out and prevents the cups from absorbing other odors in the fridge. If you want to keep them pretty, avoid stacking them.
How Long Do They Last in the Fridge?
These cheesecake cups can last for up to five days in the fridge. The flavors get better as they sit, so feel free to enjoy them later in the week. Just check for any signs of spoilage, like off smells or changes in texture.
Freezing Instructions for Longer Storage
If you want to store the cheesecake cups for longer, freezing is an option. Wrap each cup tightly in plastic wrap, then place them in a freezer bag. They can last for about three months in the freezer without losing flavor. To eat, thaw them in the fridge overnight. Enjoy your delicious treat whenever you want!
FAQs
Can I make No-Bake Oreo Cheesecake Cups dairy-free?
Yes, you can. Use dairy-free cream cheese and coconut cream instead of heavy cream. This swap keeps the taste creamy and rich without dairy.
How can I make these cheesecake cups gluten-free?
To make these cups gluten-free, use gluten-free Oreo cookies. Many brands offer gluten-free options. This change allows everyone to enjoy the dessert.
What is the best way to stabilize the whipped cream?
To stabilize whipped cream, add a little powdered sugar and cornstarch. This mix helps the cream hold its shape longer. You can also use gelatin for extra stability.
Can I use homemade whipped cream?
Absolutely! Homemade whipped cream works great. Just whip heavy cream until stiff peaks form. Use it right away for the best texture.
How can I make this recipe in advance?
You can prepare these cups a day ahead. Just assemble and chill them in the fridge. This lets the flavors meld together and saves time for your event.
In this blog post, we covered the key ingredients for No-Bake Oreo Cheesecake Cups. We explored each ingredient and substitutions. I provided a clear step-by-step guide to making the crust and filling. I also shared tips to avoid common mistakes and enhance the flavor.
In closing, these cheesecake cups are fun and easy to make. Get creative with flavors and serving ideas. Don’t forget to store extras properly for later enjoyment. Enjoy your delicious treats with friends and famil