Have you ever wanted to make your own sweet treats at home? Homemade rock candy is simple, fun, and oh-so-delicious! With just a few ingredients and easy steps, you can create colorful crystals that will wow your friends and family. In this post, I’ll guide you through the entire process, from mixing the sugar to getting those perfect crystal formations. Get ready for a sugary adventure that you won’t want to miss!
Why I Love This Recipe
- Simple Ingredients: This recipe uses only a few basic ingredients that are easy to find, making it accessible for everyone.
- Fun Activity: Making rock candy is a delightful project that can be enjoyed with kids, turning cooking into a fun and educational experience.
- Customization Options: You can experiment with different flavors and colors, allowing you to create unique candy that suits your taste.
- Great for Gifting: Homemade rock candy makes a charming and personal gift for friends and family, perfect for special occasions.
Ingredients
To make delicious homemade rock candy, gather these simple ingredients:
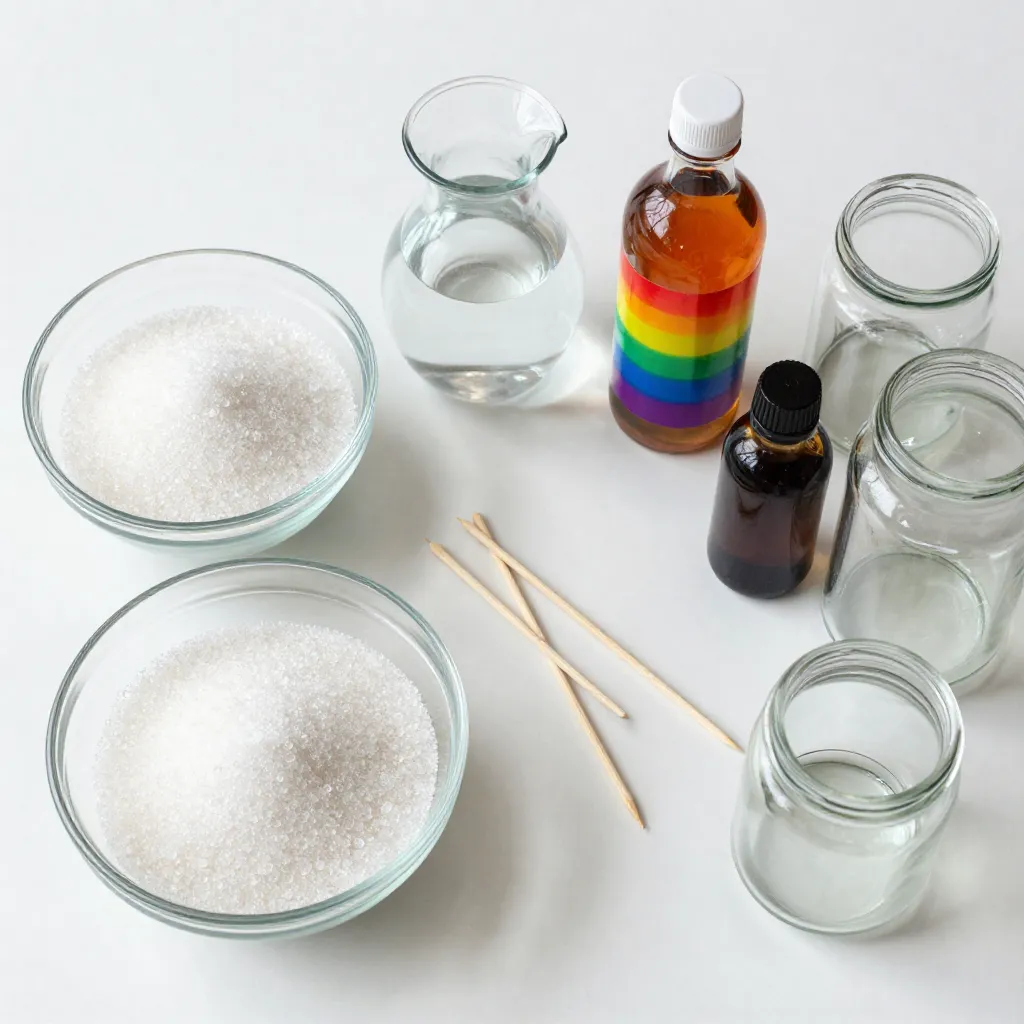
– 2 cups granulated sugar
– 1 cup water
– ½ teaspoon food coloring (your choice)
– 1 teaspoon flavor extract (like vanilla or peppermint)
– Wooden skewers or string
– Clean glass jars or containers
These ingredients are easy to find. You can use any food coloring you like. This adds fun colors to your candy. Choose a flavor extract that you love. It can change the taste of the candy. The skewers or string help the sugar crystals to form. Clean jars hold your syrup while it cools and hardens.
Now you are ready to start making your sweet crystal delights!
Step-by-Step Instructions
Preparing the Sugar Syrup
– Start by combining 2 cups of granulated sugar and 1 cup of water in a medium saucepan.
– Stir the mixture over medium heat until the sugar dissolves completely. You want a clear liquid.
– Once dissolved, stop stirring. Let it boil.
– Cook the syrup until it thickens, about 8 to 10 minutes. You will see bubbles forming.
Adding Color and Flavor
– Remove the saucepan from the heat carefully.
– Add ½ teaspoon of food coloring. You can pick any color you like!
– Then, add in 1 teaspoon of your favorite flavor extract, like vanilla or peppermint.
– Stir gently until everything is mixed well.
Setting Up for Crystallization
– Let the syrup cool for about 15 minutes.
– While it cools, prepare your jars. Make sure they are clean and dry.
– Pour the syrup into the jars, filling them halfway.
– If you’re using wooden skewers, dip one end of each skewer in the syrup.
– Roll the coated end in granulated sugar. This helps the crystals form.
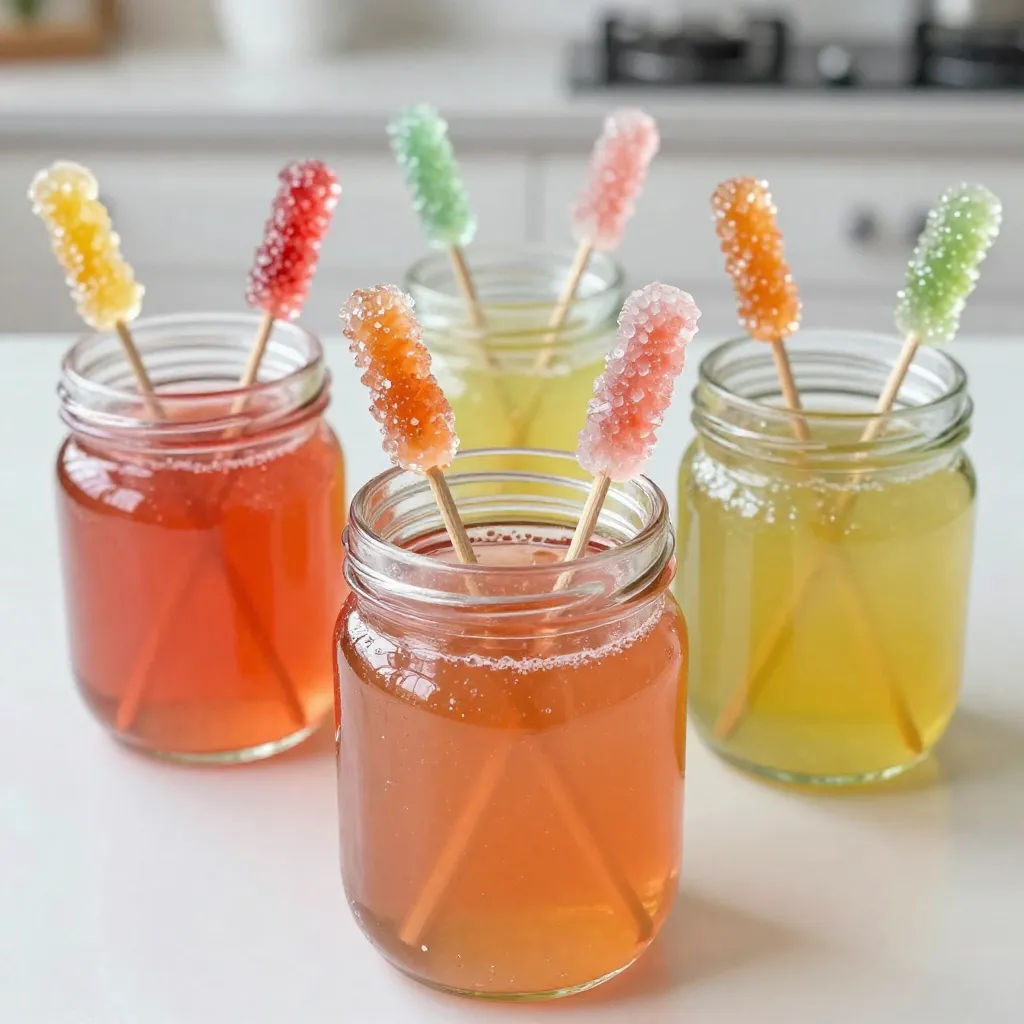
– Place the skewers in the jars with the sugared end in the syrup.
– If using string, tie one end to a pencil. Lay the pencil across the top of the jar.
– Let the string hang down into the syrup.
– Cover the jars with a cloth to keep dust away.
– Put the jars in a cool spot where they won’t be disturbed.
– Wait 7 to 10 days. You will see sugar crystals forming.
– When they look good, remove the skewer or string. Let it dry before eating.
Tips & Tricks
Cooking Techniques for Success
To make great rock candy, keep a close eye on the heat. Start with medium heat to dissolve the sugar. Once the sugar dissolves, let it boil. Do not stir while it boils, or it may create unwanted crystals. After about 8 to 10 minutes of boiling, lower the heat to simmer. This helps the syrup thicken just right.
How to Encourage Crystallization
Crystallization is key for rock candy. Here are a few tips to help:
– Coat the skewers: Dip the end of each skewer in syrup, then roll it in granulated sugar. This gives crystals something to grab onto.
– Cool, undisturbed space: Place the jars in a cool spot without moving them. Movement can break the delicate crystals.
– Patience is vital: Wait at least 7-10 days for the crystals to form. The longer you wait, the bigger the crystals can grow.
Troubleshooting Common Issues
Sometimes, things don’t go as planned. If your crystals do not form, here’s what you can do:
– Check the temperature: If it was too hot or too cold, it could stop crystals. Make sure the syrup stays at the right temperature.
– Look at your sugar: If you used less sugar, crystals may not grow. Always stick to the recipe.
– Try again: If your first batch fails, don’t be disheartened. Every batch teaches you something new. Just keep experimenting!
Pro Tips
- Choose the Right Flavor: Experiment with different flavor extracts like almond or orange for unique crystal delights.
- Color Matters: Use gel food coloring for vibrant colors that won’t dilute the syrup’s consistency.
- Control the Temperature: Ensure the syrup reaches the right temperature to promote proper crystal formation; too hot can lead to dissolving.
- Patience is Key: Allow a full week for the crystals to grow; checking too often can disturb the process!
Variations
Flavoring Options for Rock Candy
You can give rock candy a fun twist by using different extracts. Try vanilla for a classic taste or peppermint for a minty kick. Other options include almond, lemon, or even cinnamon. Each extract adds its own unique flavor. Just remember to use about one teaspoon of extract per batch. This small change can make a big difference in taste!
Colorful Rock Candy Combos
Mixing colors and flavors makes your rock candy even more exciting. You can layer colors by adding one color, letting it set, and then adding another. Try blue raspberry with lemon for a fresh burst. Or go for pink strawberry combined with green mint. These combos not only taste great but also look stunning. Your candy will be a feast for the eyes!
Creative Presentation Ideas
Think about how you want to show off your rock candy. Arrange it on a nice plate for a party or put it in small bags for gifts. You can tie a ribbon around the bags to make them special. For a fun touch, use different jars and labels. This way, your rock candy becomes a lovely treat for friends and family.
Storage Info
How to Store Homemade Rock Candy
Store your homemade rock candy in a cool, dry place. Use airtight containers to keep moisture out. Sunlight can fade colors, so keep it away from light. Glass jars work well for storage. Make sure they are clean and dry before use.
Shelf Life of Rock Candy
Homemade rock candy lasts for about 6 months. It stays fresh if kept sealed. Over time, it may lose its crunch and flavor. For the best taste, enjoy your candy within a few weeks. Check for any signs of moisture or stickiness.
Reusing or Repurposing Sugar Syrup
If you have leftover sugar syrup, use it in drinks or desserts. Mix it into iced tea for a sweet kick. You can also drizzle it over pancakes or waffles. If you want to make more candy, save it for your next batch. Just remember to store it properly!
FAQs
Can I use other types of sugar?
Yes, you can use other sugars! Brown sugar adds a rich flavor. Coconut sugar brings a hint of caramel. However, these sugars can change the color and texture. Test small batches to see what you like best.
How do I know when my rock candy is ready?
Look for crystals forming on your skewer or string. This usually happens after 7-10 days. The crystals should be clear and shiny. If they look fuzzy, you may need to let them grow longer.
Can I make rock candy in different shapes?
Absolutely! You can use molds to create fun shapes. Pour the syrup into silicone molds for stars or hearts. Just make sure the syrup cools a bit before pouring. Enjoy the creative process!
You now have all you need to make delicious rock candy at home. We covered the ingredients, essential steps, helpful tips, and creative variations. This fun treat lets you play with flavors and colors. Remember, patience is key for crystal growth. Store your rock candy properly, and it will last longer. Enjoy the sweet rewards of your hard work and share them with friends and family. Now, it’s time to gather your supplies and begin your rock candy adventure! Happy candy-makin