
Craving a delicious snack that's both easy and tasty? Look no further than ham and cheese biscuit sliders! These little sandwiches are perfect for a party or a cozy night in. I’ll guide you through simple steps for making flaky biscuits and gooey cheese that will melt in your mouth. Get ready to impress your friends and family with this crowd-pleaser. Let’s dive into the recipe!
Why I Love This Recipe
- Quick and Easy: This recipe is simple to prepare, making it perfect for a busy weeknight dinner or a last-minute gathering.
- Comfort Food: The combination of warm biscuits, savory ham, and gooey cheese is the ultimate comfort food that everyone loves.
- Customizable: You can easily swap out the ham and cheese for your favorites, or add veggies for an extra twist.
- Perfect for Any Occasion: Whether it's a game day snack, a brunch dish, or a fun party appetizer, these sliders fit the bill.
Ingredients
Key Ingredients for Ham and Cheese Biscuit Sliders
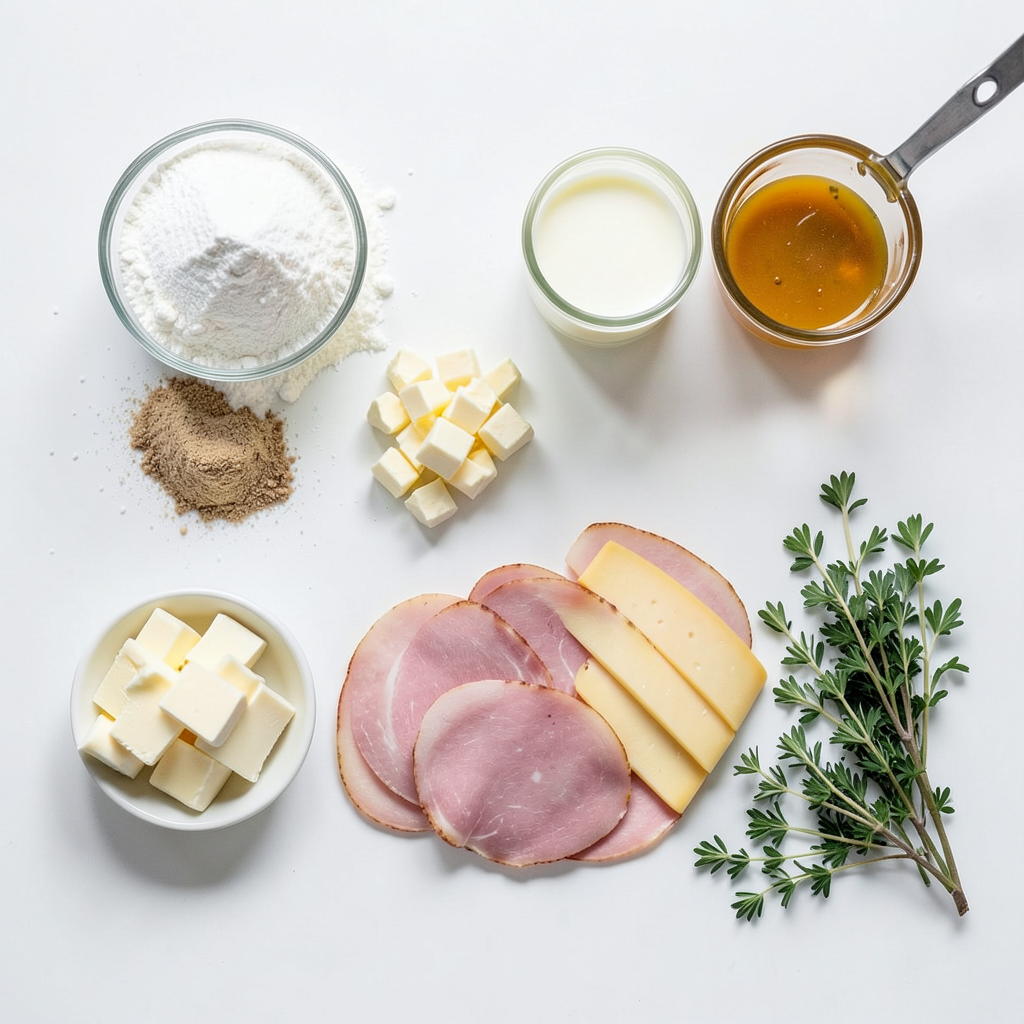
To make tasty Ham and Cheese Biscuit Sliders, you will need:
- 2 cups all-purpose flour
- 1 tablespoon baking powder
- 1 teaspoon salt
- 1/2 teaspoon garlic powder
- 1/4 cup cold butter, diced
- 3/4 cup milk
- 8 ounces sliced ham
- 8 ounces sliced cheese (cheddar or Swiss)
- 2 tablespoons honey mustard
These ingredients come together to create a soft biscuit, with savory ham and melty cheese.
Substitutions and Alternatives
You can change some ingredients for your taste or needs:
- Flour: Use whole wheat flour for a healthier option.
- Baking powder: If you don’t have baking powder, mix 1/2 teaspoon of baking soda with 1 teaspoon of vinegar as a substitute.
- Ham: Turkey or chicken can replace ham for a different flavor.
- Cheese: Try mozzarella or pepper jack for a fun twist.
- Honey mustard: Use regular mustard or mayo if you prefer.
These swaps keep the spirit of the recipe while giving you room to play.
Optional Garnishes
For extra flavor and a pop of color, you can add:
- Fresh herbs like chives or parsley
- A sprinkle of black pepper
- A drizzle of extra honey mustard on top
Garnishes add a lovely touch and make your sliders look even more appetizing.
Step-by-Step Instructions
Preparation of the Biscuit Dough
To start, gather your ingredients. You need 2 cups of all-purpose flour, 1 tablespoon of baking powder, 1 teaspoon of salt, and 1/2 teaspoon of garlic powder. Cut 1/4 cup of cold butter into small pieces. This butter will help make your biscuits flaky.
In a large bowl, mix the flour, baking powder, salt, and garlic powder. Add the diced butter. Use your fingers or a pastry cutter to combine them. The mixture should look like coarse crumbs.
Next, pour in 3/4 cup of milk. Stir gently until just combined. Be careful not to overmix. Your dough should be a little sticky but hold together well.
Baking the Biscuits to Perfection
Now, turn the dough onto a floured surface. Pat it down to about 1 inch thick. Use a round cutter to cut out your biscuits. Place them on a baking sheet lined with parchment paper.
Preheat your oven to 425°F (220°C). Once the oven is hot, bake the biscuits for 12 to 15 minutes. They should be golden brown when done. Keep an eye on them so they don’t burn.
Assembling the Sliders
After baking, let the biscuits cool for a few minutes. Carefully split each biscuit in half. On the bottom half, spread a bit of honey mustard. Layer with 8 ounces of sliced ham and top with a slice of cheese.
Next, place the assembled sliders back in the oven for 5 minutes. This step melts the cheese and makes it bubbly. Remove them from the oven, place the top half back on, and add fresh herbs if you like. Enjoy your tasty sliders!
Tips & Tricks
How to Achieve Fluffy Biscuits
To make fluffy biscuits, start with cold butter. Cut it into the dry mix until it looks like crumbs. This helps the biscuits rise. When adding milk, mix gently. Overworking the dough can lead to tough biscuits. Remember, a slightly sticky dough is key.
Best Cheese Pairings for Sliders
Cheddar and Swiss cheese work great for these sliders. Cheddar adds a sharp flavor, while Swiss melts perfectly. You can also try gouda for a smokier taste. For a creamy option, consider using fontina cheese. Mix and match to find your favorite combo.
Common Mistakes to Avoid
One common mistake is using warm butter. Always keep your butter cold for fluffy biscuits. Another mistake is rolling the dough too thin. Aim for about one inch thick when cutting your biscuits. Lastly, don’t skip the honey mustard; it adds a nice zing to your sliders.
Pro Tips
- Use Cold Ingredients: Ensure your butter and milk are cold when making the biscuit dough. This helps create a flaky texture in the biscuits.
- Don't Overwork the Dough: Mix the dough just until it comes together. Overworking can lead to tough biscuits.
- Experiment with Cheese: While cheddar and Swiss are classic choices, try using pepper jack or gouda for a different flavor profile.
- Herb Infusion: Adding fresh herbs like chives or parsley not only garnishes the sliders but also enhances their flavor.
Variations
Adding Different Meats
You can switch out the ham for many other meats. Turkey or roast beef makes great sliders. If you like spicy food, try adding pepperoni or salami. These options add new flavors and fun textures. Just slice the meat thin so it fits well in the biscuit. You can mix and match meats for a fun twist.
Vegetarian Options for Biscuit Sliders
If you want a vegetarian slider, skip the meat. You can use grilled veggies instead. Try bell peppers, mushrooms, or zucchini. These veggies add great taste and color. Another option is to use plant-based meats. Look for sliced veggie deli meats. They can give you the same feel as ham but without the meat.
Creative Sauces and Spreads
The sauce can change the whole flavor of your sliders. Instead of honey mustard, try BBQ sauce for a smoky taste. Ranch dressing adds a creamy flavor. You can even use pesto for a fresh twist. Different sauces can take your sliders to new heights. Don't be afraid to experiment with flavors.
Storage Info
How to Store Leftover Sliders
To keep your leftover sliders fresh, place them in an airtight container. You can also wrap them in foil or plastic wrap. This helps prevent them from drying out. Store the sliders in the fridge for up to three days. If you want to enjoy them later, freezing is a great option.
Reheating Instructions
To reheat your sliders, preheat the oven to 350°F (175°C). Place the sliders on a baking sheet. Cover them with foil to keep them moist. Heat for about 10 to 15 minutes or until they are warm. You can also use a microwave for quick heating. Just cover them with a damp paper towel and heat for 30 seconds to 1 minute.
Freezing Biscuit Dough
If you want to save time later, freeze your biscuit dough. After making the dough, shape it into a disc and wrap it tightly in plastic wrap. Place it in a freezer bag to keep it sealed. This way, you can pull it out when you’re ready to bake. The dough stays good for up to three months in the freezer. Just thaw it in the fridge overnight before using.
FAQs
Can I use gluten-free flour for this recipe?
Yes, you can use gluten-free flour. Look for a good blend that works for baking. This swap may change the texture slightly, but it should still taste great. Follow the same measurements as the original recipe. If your mix needs it, add a bit more liquid to keep the dough moist.
How long do the sliders keep in the fridge?
The sliders can last for about three days in the fridge. Store them in an airtight container to keep them fresh. When ready to eat, you can warm them up in the oven. This helps keep the biscuits soft and the cheese gooey.
What can I serve with Ham and Cheese Biscuit Sliders?
These sliders pair well with various sides. Try serving them with a fresh salad or crispy fries. You can also add some fruit for a sweet touch. A bowl of soup is a great idea too, especially on chilly days.
You learned about key ingredients and how to make ham and cheese biscuit sliders. I shared helpful tips for fluffy biscuits and tasty cheese pairings. You also discovered fun variations, like different meats or vegetarian options. Proper storage and reheating methods keep your sliders fresh. Remember, your creativity makes each batch special. Enjoy making these simple and flavorful sliders for your next meal!