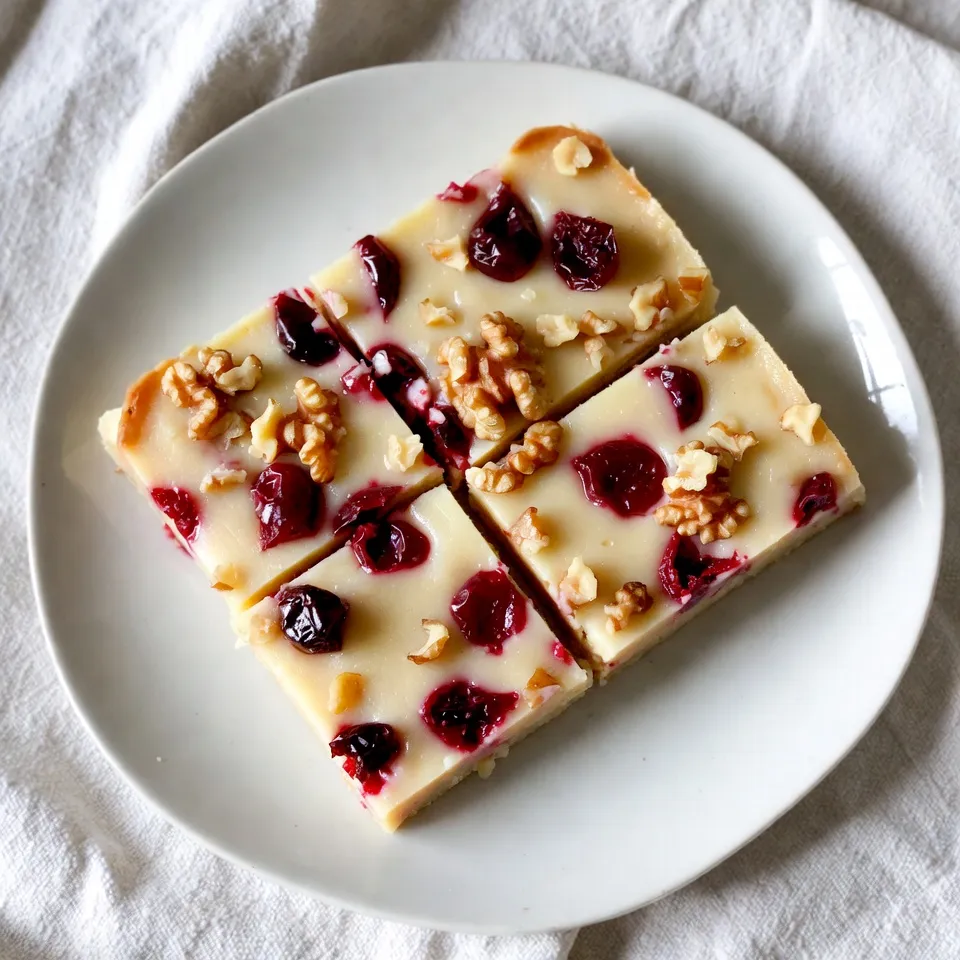
Are you ready to treat yourself to an easy and delicious dessert? Cherry White Chocolate Fudge is a sweet delight that combines rich white chocolate with tart cherries. This simple recipe requires just a few key ingredients and minimal effort. I’ll guide you through each step, so you can impress friends and family with this irresistible treat. Let’s dive into the sweet journey of making your new favorite fudge!
Why I Love This Recipe
- Delicious Flavor Combination: The sweet and creamy white chocolate pairs perfectly with the tartness of dried cherries, creating a delightful balance in every bite.
- Easy to Make: This fudge requires minimal ingredients and just a few simple steps, making it a perfect treat for both novice and experienced bakers.
- Perfect for Gifting: Cut into squares and packaged nicely, this fudge makes for a thoughtful homemade gift during the holidays or special occasions.
- Customizable: Feel free to add your favorite nuts or swap out the dried cherries for other fruits to create your own unique version of this delicious fudge.
Ingredients
Main Ingredients
– 2 cups white chocolate chips
– 1 can (14 ounces) sweetened condensed milk
– 1 cup dried cherries, chopped
– 1 teaspoon vanilla extract
Optional Add-ins
– 1/2 cup chopped walnuts
– A pinch of salt
Equipment Needed
– Baking dish
– Parchment paper
– Medium saucepan
When making Cherry White Chocolate Fudge, the right ingredients matter. First, you need white chocolate chips. They provide a creamy base. Next, sweetened condensed milk adds sweetness and a smooth texture. Dried cherries bring a burst of flavor and chewy goodness. Vanilla extract adds depth to the taste.
For those who like a bit of crunch, chopped walnuts are a great choice. They add texture and nutty flavor. A pinch of salt brings out all the flavors in the fudge.
Now, let’s talk about what you need to cook this treat. You will need a baking dish to hold the fudge, parchment paper to line it, and a medium saucepan for melting the chocolate. These tools will make your fudge-making smooth and easy.

Step-by-Step Instructions
Prepare Baking Dish
– Line with parchment
– Ensure overhang for easy removal
Start by getting an 8×8 inch baking dish. Line it with parchment paper. Make sure the paper hangs over the edges. This helps you lift the fudge out easily later.
Melt Chocolate Mixture
– Combine ingredients in saucepan
– Heat and stir until smooth
Next, take a medium saucepan. Add 2 cups of white chocolate chips, one can of sweetened condensed milk, and a pinch of salt. Heat this mixture over low heat. Stir it constantly. Keep stirring until the chocolate melts and the mix is smooth.
Combine Remaining Ingredients
– Stir in vanilla, cherries, and walnuts
– Mix thoroughly to distribute
Once the chocolate is smooth, take it off the heat. Stir in one teaspoon of vanilla extract. Then, add one cup of chopped dried cherries. If you like, you can also add 1/2 cup of chopped walnuts. Mix everything well. Make sure the cherries and walnuts are spread out evenly in the fudge.
Setting the Fudge
– Pour into prepared dish
– Refrigerate until set
Now, pour the fudge mixture into the baking dish. Use a spatula to spread it evenly. Smooth the top to make it look nice. Place the dish in the fridge. Let the fudge set for at least two hours.
Cutting and Serving
– Lift out and cut into squares
– Presentation suggestions
After the fudge is set, lift it out using the parchment overhang. Cut it into squares. For a pretty touch, serve it on a nice platter. You can add more dried cherries or sprinkle crushed walnuts on top. Enjoy your sweet treat!
Tips & Tricks
Best Practices for Melting Chocolate
To melt chocolate well, keep the heat low. High heat can burn the chocolate, ruining the flavor. Stir continuously as it melts. This helps the chocolate melt evenly and prevents clumps.
Ensuring Proper Texture
Mix the fudge until smooth. This step is vital for a creamy fudge. If you leave lumps, it won’t taste as good. After mixing, refrigerate the fudge for two hours. This time allows it to set properly and become firm.
Flavor Enhancements
You can enhance your fudge with fun flavors. Try adding orange zest or almond extract for a twist. For garnishes, top the fudge with extra chopped dried cherries or walnuts. This adds color and a nice crunch.
Pro Tips
- Use Quality Chocolate: Opt for high-quality white chocolate chips for a richer flavor and smoother texture in your fudge.
- Chop Cherries Evenly: Chop the dried cherries into uniform pieces for consistent distribution throughout the fudge, ensuring every bite is delicious.
- Experiment with Nuts: Feel free to substitute walnuts with other nuts like pecans or almonds to customize the flavor and texture of your fudge.
- Proper Storage: Store the fudge in an airtight container in the refrigerator to maintain its freshness and prevent it from drying out.
Variations
Flavor Variants
You can easily change the flavor of your Cherry White Chocolate Fudge. Adding different dried fruits can create new tastes. Dried apricots or cranberries work well. They add a nice tartness. You can also try flavored extracts. Almond or orange extract adds a unique twist. Just remember to keep the amount small. A little goes a long way in flavor.
Dietary Adjustments
For those who follow a vegan diet, you can make some swaps. Use vegan white chocolate chips and coconut cream instead of sweetened condensed milk. This keeps the fudge creamy and sweet. If you need nut-free options, simply leave out the walnuts. The fudge will still taste great without them.
Serving Variants
How you serve the fudge can make it even more special. You can cut it into fun shapes, like hearts or stars. This is perfect for parties. For a nice touch, serve it on a decorative platter. Add a few extra dried cherries or crushed walnuts on top for garnish. It makes the fudge look fancy and inviting!
Storage Info
How to Store Fudge
To keep your cherry white chocolate fudge fresh, use an airtight container. This helps block moisture and air, which can ruin the fudge’s texture. Place the fudge in the container after it cools. I like to separate layers with parchment paper to avoid sticking. Store the fudge in the refrigerator for the best results.
Shelf Life
When stored correctly, this fudge lasts up to one week in the fridge. If you notice any changes, check for signs of spoilage. Look for a dry or hard texture, or any off smells. If you see these signs, it’s best to toss the fudge.
Freezing Options
You can freeze cherry white chocolate fudge for longer storage. Cut the fudge into squares and wrap each piece tightly in plastic wrap. Place them in a freezer-safe bag or container. This way, you can enjoy a sweet treat whenever you want! To thaw, just leave the fudge in the fridge overnight. You can also let it sit at room temperature for a few hours. Enjoy your fudge while it’s fresh!
FAQs
How long does it take for fudge to set?
Fudge usually takes about two hours to set in the fridge. This allows it to become firm and easy to cut. If you want it to set faster, try placing it in a cooler spot. Just check it often to avoid freezing.
Can I use milk chocolate instead of white chocolate?
Yes, you can use milk chocolate. It will change the flavor and color of the fudge. Milk chocolate makes it sweeter and creamier. Just remember to adjust the sweetness if you want a balanced taste.
What can I substitute for sweetened condensed milk?
You can use coconut cream or homemade cashew cream. Both options add creaminess to your fudge. If you use coconut cream, choose a full-fat version for the best results.
Is it possible to make this fudge without walnuts?
Absolutely! You can make the fudge without walnuts. Just skip adding them to the mix. You can also add other nuts or seeds if you want some crunch.
How do I know when fudge is done?
The fudge is done when it is smooth and glossy after mixing. You should see no lumps of chocolate. Once you pour it into the dish, it should spread easily. After chilling, it will be firm and ready to cut.
This blog post covered how to make delicious white chocolate fudge. You learned about main and optional ingredients, along with helpful tips for melting and mixing. We explored variations to suit different tastes and dietary needs. Lastly, we discussed storage tips to keep your fudge fresh.
Enjoy making this treat! It’s simple and fun. You can customize it how you like. Sharing it with friends and family will make it even better. Happy bakin