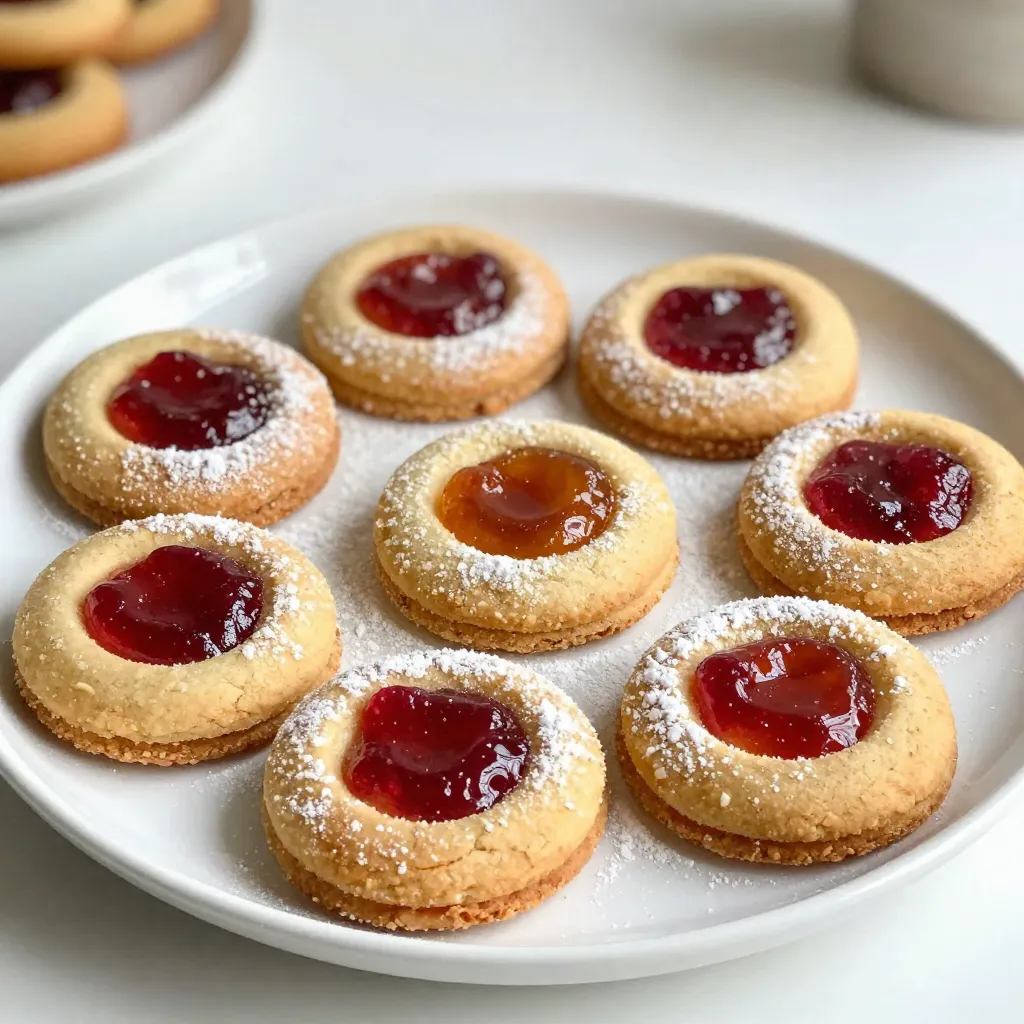
Are you ready to bake a sweet treat that’s both simple and delicious? Butter Thumbprint Cookies are perfect for any occasion, with a soft, buttery texture that melts in your mouth. You’ll love how easy they are to make and how quickly your family devours them. In this post, I’ll share everything you need, from ingredients to baking tips, to create these tasty cookies. Let’s get baking!
Why I Love This Recipe
- Deliciously Buttery: The rich flavor of butter in these cookies creates a melt-in-your-mouth experience that is simply irresistible.
- Customizable Fillings: With options for raspberry, apricot, or strawberry jam, you can easily tailor these cookies to your personal taste preferences.
- Easy to Make: This straightforward recipe requires minimal ingredients and time, making it perfect for bakers of all skill levels.
- Perfect for Sharing: These cookies are ideal for gatherings or gifting, as they look lovely and taste delightful, bringing smiles to friends and family alike.
Ingredients
Making Butter Thumbprint Cookies is easy and fun. Here’s what you need:
– 1 cup unsalted butter, softened
– ¾ cup granulated sugar
– 2 teaspoons vanilla extract
– 2 cups all-purpose flour
– ½ teaspoon salt
– ½ teaspoon baking powder
– ½ cup fruit jam (raspberry, apricot, or strawberry)
– Optional: powdered sugar for dusting
Each ingredient plays a key role in the taste and texture of the cookies. The unsalted butter gives these cookies a rich, creamy flavor. Granulated sugar adds sweetness and helps with the cookie’s texture.
Vanilla extract provides a warm undertone that makes each bite comforting. The all-purpose flour gives the cookies their structure. Salt enhances all the flavors, while baking powder helps them rise slightly during baking.
Using fruit jam is what makes these cookies special. Choose your favorite flavor to create a unique treat. Lastly, if you want to impress guests, a light dusting of powdered sugar adds a nice touch.
Gather these ingredients, and you’re ready to bake delicious Butter Thumbprint Cookies!

Step-by-Step Instructions
Prepping the Dough
1. Preheat your oven to 350°F (175°C). Line two baking sheets with parchment paper. This helps the cookies not stick.
2. Cream the butter and sugar together in a large bowl. Use a hand mixer for 2-3 minutes until fluffy. This makes the cookies soft and light.
3. Add the vanilla extract to the butter mixture. Mix until everything is well combined. This adds a lovely flavor.
Combining Dry Ingredients
1. In a separate bowl, whisk together the flour, baking powder, and salt. This helps mix the dry ingredients evenly.
2. Gradually mix the dry ingredients into the wet mixture. Stir just until combined. Avoid overmixing to keep cookies tender.
Forming and Baking Cookies
1. Scoop about 1 tablespoon of dough and roll it into a ball. Place these on the baking sheets, leaving about 2 inches between them.
2. Make an indentation in the center of each dough ball with your thumb. This is where the jam will go.
3. Fill each indentation with about ½ teaspoon of fruit jam. Raspberry, apricot, or strawberry work well.
4. Bake in the oven for 12-15 minutes. Look for lightly golden edges. This means they are done!
5. Remove from the oven and let cool for a few minutes. Transfer to a wire rack to cool completely. If you want, dust with powdered sugar for a nice touch.
Tips & Tricks
Achieving the Perfect Texture
To get the best texture in your cookies, use room temperature butter. Soft butter mixes well and helps the cookies rise. Cold butter can make your dough dense. After creaming the butter and sugar, be careful not to overmix the dough. Mix until just combined. This keeps your cookies light and tender.
Using Different Fillings
You can get creative with fillings for your thumbprint cookies. I recommend classic flavors like raspberry, apricot, or strawberry jam. Each gives a unique taste that pairs well with the buttery cookie. If you want to try something new, use chocolate hazelnut spread or lemon curd. These options add a fun twist to your treats.
Presentation Suggestions
To make your cookies look even more special, dust them with powdered sugar after baking. This adds a nice touch and makes them more inviting. You can also serve the cookies with a side of extra jam. This way, guests can add more if they like. It gives a lovely homemade feel and makes each cookie even more delightful.
Pro Tips
- Use Room Temperature Butter: Ensure your butter is softened to room temperature for easy creaming and a fluffy texture.
- Chill the Dough: If the dough feels too soft to handle, refrigerate it for 20-30 minutes to make rolling easier.
- Experiment with Flavors: Try different fruit jams or even chocolate ganache for a unique twist on the classic thumbprint cookie.
- Store Properly: Keep cookies in an airtight container at room temperature for up to a week to maintain freshness.
Variations
Gluten-Free Option
You can easily make these thumbprint cookies gluten-free. Just swap regular flour with gluten-free flour. Choose a blend that works well in baking. This change keeps the cookies soft and tasty.
Vegan Thumbprint Cookies
To make vegan thumbprint cookies, replace the butter with a vegan butter. You can also use applesauce or mashed bananas as an egg substitute. For fillings, try using fruit jams or nut butters. These options keep the cookies delicious and plant-based.
Flavor Twists
Want to add a fun twist? Consider mixing in some citrus zest. Lemon or orange zest brightens the cookies. You can also fold in chopped nuts or chocolate chips for extra crunch. These little changes make your cookies even more special!
Storage Info
How to Store Cookies
To keep your Butter Thumbprint Cookies fresh, store them in an airtight container. This helps to keep them soft. You can stack the cookies with layers of parchment paper between them. This prevents them from sticking together. Store the container in a cool, dry place away from sunlight. For best taste, enjoy your cookies within a week.
Freezing Instructions
You can freeze both cookie dough and baked cookies. If freezing dough, scoop and shape the balls first. Place them on a baking sheet and freeze until solid. Then, transfer them to a freezer bag. This will save space. For baked cookies, let them cool completely before freezing. Place them in a freezer-safe container. When ready to eat, thaw the cookies at room temperature. You can also warm them in the oven for a few minutes. This makes them taste fresh again!
FAQs
How can I make my thumbprint cookies softer?
To make your thumbprint cookies softer, use room temperature butter. This helps create a creamy texture. Avoid overmixing the dough, as that can make them tough. You can also add a little bit more flour to keep them soft and chewy.
Can I use different types of sugar?
Yes, you can use different types of sugar. Brown sugar will add moisture and a slight caramel flavor. You can mix it with granulated sugar for a nice balance. Just remember that using only brown sugar may change the cookie’s texture.
What should I do if my dough is too sticky?
If your dough is too sticky, chill it in the fridge for 30 minutes. This will help firm it up. You can also add a little flour to make it easier to handle. Just be careful not to add too much flour.
How long do these cookies last?
These cookies last about one week at room temperature. Store them in an airtight container to keep them fresh. If you want them to last longer, you can freeze them for up to three months.
Can I use homemade jam instead of store-bought?
Absolutely! Homemade jam works great in these cookies. Just make sure your jam is thick enough so it doesn’t run out of the thumbprint. You can use any flavor you like, such as raspberry or apricot, for a personal touch.
You’ve learned how to make tasty thumbprint cookies. We covered the main ingredients, step-by-step instructions, and helpful tips. You also found variations and storage info to keep them fresh.
Remember, the key to great cookies is using the right ingredients and techniques. Get creative with flavors and fillings. Enjoy baking and sharing these treats with friends and family! You now have everything you need to make these cookies a hi